Flashing an Uno R4 inspired Custom PCB with Serial
The first time you make your own custom PCB based on an Arduino design can be intimidating, but once successful you'll never buy another card again.
Raising Awesome
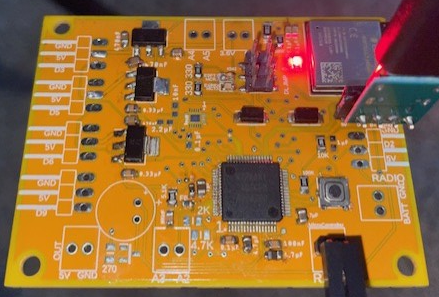
Custom Drone Flight Controller
The Arduino R4 Uno Minima and it's big brother the Uno R4 Wifi are amazing cards. The awesome part of Arduino is that they stick to their Open Source values and publish their schematics. This gives you time tested capacitor and resistance values to support the chips and good practices for layout. In addition, they have built a great community to help answer any questions on their hardware choices.
If you already mastered KiCAD to design your own board and ship the design off to PCBWay for fabrication, the next hurdle will be programming it based on your hardware design. An approach I favor is having minimal interface hardware as I can and reliably using Serial and the Arduino IDE with the Renesas Flash Programmer to get my sketch on the device.
Here are the steps to upload your sketch on your custom PCB with a serial interface:
- If you have a bare bones custom PCB with the R7FA4 as its microcontroller, I suggest using the Arduino IDE with a board specification for the Arduino Uno R4 Minima. This will give you the essentials for sketching on that microcontroller chip.
- Code and save your sketch and then do the menu option Sketch-->Export Compiled Binary. You'll find the exported file in your folder under "build/sketchname.hex".
- However, that is half the equation. Next, you need the Minima bootloader hex to pair it up when you flash it. You can find that here:
- <Arduino>/packages/arduino/hardware/renesas_uno/<version>/bootloaders/UNO_R4/dfu_minima.hex
-
- <Arduino> is typically:
- Windows:
C:\Users\\AppData\Local\Arduino15 - macOS:
~/Library/Arduino15 - Linux:
~/.arduino15 - <version> is the installed version of the Renesas core (e.g.,
1.0.2)
- You need a tool to do the flashing with Serial. Get the Renesas Flash Programmer (RFP) here: Renesas Flash Programmer (Programming GUI) | Renesas.
- Hopefully you designed your PCB layout for this: Pull the MD (Mode Select) pin low and reset the board (pull the EN chip low). This will put the R7FA4 in flash mode.
- Hook up a USB-to-Serial cable to your Microcontroller TX and RX pins.
- Your Connect Settings tab needs configured to your COM port.
- Add the two files to the RFP tool:
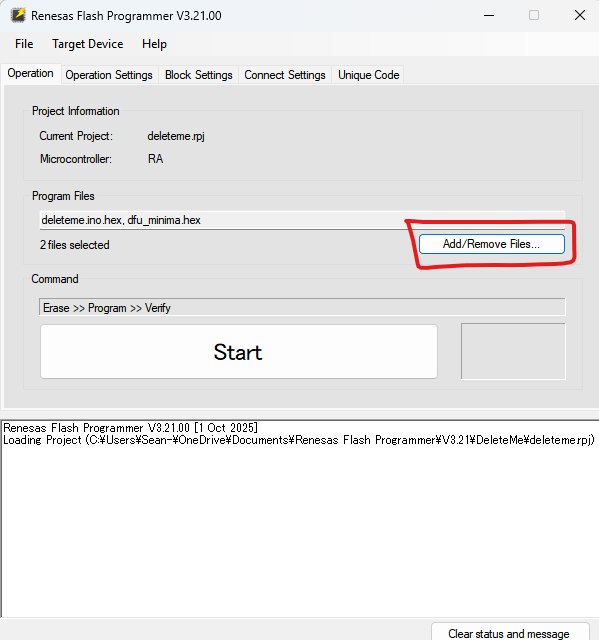
- Don't worry about offsets that you will see in the file table, the hex files have the appropriate instructions imbedded to land the hex to the appropriate data locations. Leave all other tabs to their defaults. The Block Settings tab should simply have everything selected.
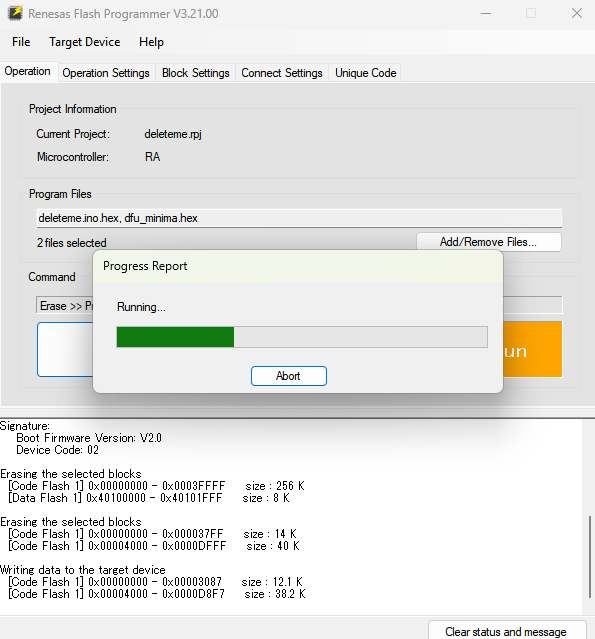
- Click the big start button and it should begin to flash and verify:
- If it doesn't work, make sure your Arduino IDE isn't tying up your COM port. Simply close it to be sure.
That's it! I found that the only trouble I run into is me hooking wires up backwards. Otherwise, it's an awesome way to program your custom PCBs built on Uno R4 inspiration.
However, if it gets old, you can always make your own Board platform specification in the Arduino IDE. This takes three key steps: 1) Create a Repo on Github, 2) copy a similar boards hardware folder structure so you can tweak it, and 3) a lot of patience.
I did just that for this board (Rawpter Flight Controller). It can be added using the additional boards manager URLS setting in File--> Preferences of the Arduino IDE:
https://raw.githubusercontent.com/RaisingAwesome/Rawpter4/main/package_rawpter4_index.json
See the repo for details: RaisingAwesome/Rawpter4: Rawpter 4 is a Drone Flight Controller PCB built on the RA4M1 and ESP32-S3 and programmed by the Arduino IDE.